How to Make Coffee Coconut Milk Ice Cream
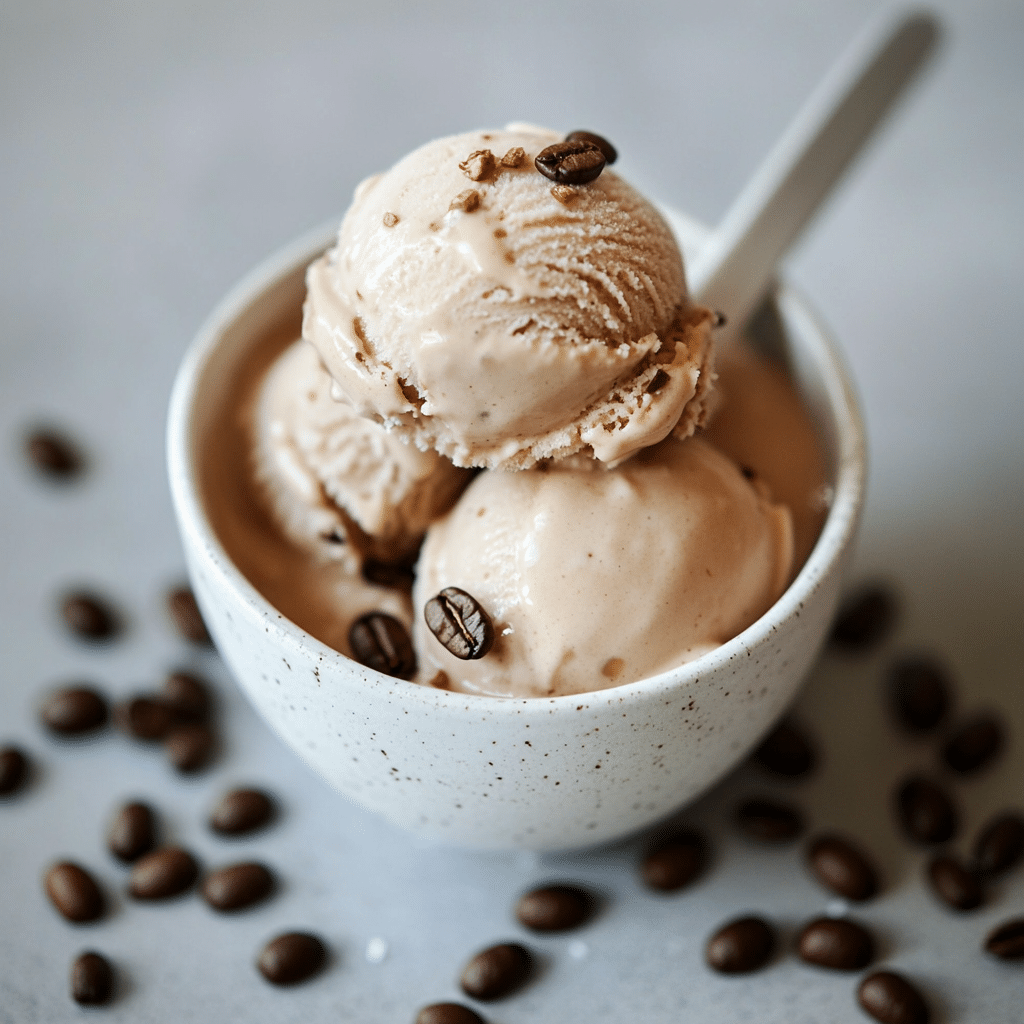
If you’re craving a treat that’s both refreshing and indulgent, this Coffee Coconut Milk Ice Cream is the answer. It combines the robust, aromatic flavor of coffee with the creamy, tropical richness of coconut milk to create a dairy-free delight that’s perfect for beating the heat. Whether you’re vegan, lactose intolerant, or just love experimenting with bold flavors, this recipe offers a smooth, easy-to-make dessert that feels like a special reward every time you scoop it.
Why You’ll Love This Recipe
- Dairy-free delight: Perfect for those avoiding dairy but still craving creamy ice cream.
- Bold coffee flavor: Rich espresso or brewed coffee gives a deep, sophisticated taste.
- Simple ingredients: Uses pantry staples for easy, stress-free preparation.
- Customizable: Easily adjusted based on your sweetness and texture preferences.
- Perfect summer treat: Refreshing, cold, and energizing on hot days.
Ingredients You’ll Need
Each ingredient in this Coffee Coconut Milk Ice Cream plays a crucial role in achieving that perfect balance of creaminess, flavor, and sweetness. The list is simple but impactful, creating a tropical twist on a classic frozen dessert.
- Coconut milk: Use full-fat canned coconut milk for the best creamy texture.
- Strong coffee or espresso: Brewed fresh for that intense coffee flavor that shines.
- Sugar or natural sweetener: Adjust to your taste for just the right hint of sweetness.
- Vanilla extract: Adds depth and rounds out the coffee notes beautifully.
- Salt: A pinch to enhance all the flavors and balance the sweetness.
Variations for Coffee Coconut Milk Ice Cream
This recipe is incredibly flexible, so don’t hesitate to tweak it according to your pantry, dietary needs, or flavor cravings. Each variation offers a fun twist while keeping the heart of the recipe intact.
- Mocha flavor: Add cocoa powder or melted dark chocolate for a chocolate-coffee combo.
- Sweetener swaps: Try maple syrup, agave, or coconut sugar to vary sweetness profiles.
- Nutty crunch: Fold in toasted coconut flakes or chopped nuts for texture.
- Spiced twist: Incorporate cinnamon, cardamom, or nutmeg for warming spice notes.
- Lower caffeine: Use decaf coffee for a gentler version suitable for any time of day.

How to Make Coffee Coconut Milk Ice Cream
Step 1: Brew the Coffee
Start by brewing a strong cup of coffee or pulling a couple of espresso shots. Set this aside to cool completely—it’s important the coffee is cold before mixing so it doesn’t melt the ice cream base.
Step 2: Prepare the Coconut Milk Base
Open a can of full-fat coconut milk and give it a good shake to combine the cream and liquid. Pour it into a bowl along with sugar, vanilla extract, and a pinch of salt. Whisk everything together until the sugar dissolves and the mixture is smooth.
Step 3: Combine and Chill
Slowly stir the cooled coffee into the coconut milk mixture, ensuring everything is well mixed. Cover the bowl and refrigerate it for at least one hour so it chills thoroughly, which helps with the texture of your ice cream later.
Step 4: Freeze the Mixture
Pour the chilled mixture into your ice cream maker and churn according to manufacturer instructions—usually about 20-30 minutes—until it reaches a soft-serve consistency. If you don’t have an ice cream maker, pour the mixture into a shallow container and freeze, stirring every 30 minutes until thick.
Step 5: Final Freeze
Transfer the ice cream to an airtight container and freeze for at least 3-4 hours to firm up. This step is key to achieving that perfect scoopable texture you want.
Pro Tips for Making Coffee Coconut Milk Ice Cream
- Use full-fat coconut milk: It provides the richest, creamiest texture without dairy.
- Chill everything: Make sure your coffee and coconut milk base are fully cold before churning.
- Sweeten gradually: Adjust sweetness after chilling and before freezing to taste.
- Don’t skip the salt: It amplifies flavors and balances the bitterness of coffee.
- Custom churn timing: Stop the churn earlier for softer ice cream or longer for a denser texture.
How to Serve Coffee Coconut Milk Ice Cream
Garnishes
Top your Coffee Coconut Milk Ice Cream with shredded toasted coconut, a sprinkle of cinnamon, or a drizzle of dark chocolate sauce to amplify its tropical and coffee flavors.
Side Dishes
This ice cream pairs beautifully with vegan brownies, fresh berries, or polished off alongside a crispy biscotti for an elegant coffee-inspired treat.
Creative Ways to Present
Try serving it in coconut shells or small espresso cups for that tropical vibe, or layer it in parfait style with granola and coconut whipped cream for a fancy yet simple dessert.
Make Ahead and Storage
Storing Leftovers
Keep leftover Coffee Coconut Milk Ice Cream in an airtight container in the freezer. Properly stored, it maintains its flavor and texture for up to 2 weeks.
Freezing
If you want to prepare the base in advance, you can mix it and freeze the container directly before churning, but the texture will be smoother and lighter if churned fresh after freezing.
Reheating
This dessert is best enjoyed cold! However, if it becomes too hard, let it sit at room temperature for 5-10 minutes before scooping to soften it slightly.
FAQs
Can I use light coconut milk instead of full-fat?
Light coconut milk tends to be thinner and lower in fat, which will result in a less creamy ice cream—full-fat is best for that rich texture.
Do I need an ice cream maker to make this recipe?
Nope! While an ice cream maker makes the process easier and results creamier, you can freeze and stir periodically to break up ice crystals if you don’t have one.
How strong should the coffee be?
The coffee should be brewed strong or use espresso to ensure the flavor holds up against the creamy coconut milk base.
Is this recipe vegan?
Yes, it uses coconut milk instead of dairy, making it suitable for a vegan diet, as long as you use vegan-friendly sweeteners.
Can I make this ahead for a party?
Absolutely! Prepare the base and churn the ice cream a day ahead, then store it in the freezer until ready to serve for a stress-free dessert.
Final Thoughts
This Coffee Coconut Milk Ice Cream is a personal favorite I just adore sharing because it delivers that perfect blend of bold coffee and creamy coconut in a way that’s truly refreshing and easy to love. So why not give it a try? It’s a simple recipe that turns everyday ingredients into something truly special, perfect for summer days or any time you need a cool, delightful pick-me-up.
Related Posts
- Crave-worthy Chocolate Protein Pudding Recipe
- 5 Reasons Chocolate Chia Pudding Boosts Energy
- How to Make Delicious Watermelon Fruit Pizza
Coffee Coconut Milk Ice Cream

This Coffee Coconut Milk Ice Cream is a refreshing and indulgent dairy-free dessert that combines strong, aromatic coffee with creamy, tropical coconut milk. Perfect for vegans, those lactose intolerant, or anyone craving a bold and smooth ice cream, this recipe uses simple pantry ingredients and can be customized to your taste preferences.
- Prep Time: 15 minutes
- Cook Time: 30 minutes (churning time) plus freezing time
- Total Time: 4 hours 45 minutes (including chilling and freezing)
- Yield: About 4 servings 1x
- Category: Dessert
- Method: No-Bake, Churning
- Cuisine: Fusion
- Diet: Vegan, Gluten Free, Dairy Free
Ingredients
Main Ingredients
- 1 can (13.5 oz) full-fat coconut milk
- 1 cup strong brewed coffee or 2 shots espresso, cooled
- 1/3 to 1/2 cup sugar or natural sweetener, adjusted to taste
- 1 teaspoon vanilla extract
- Pinch of salt
Instructions
- Brew the Coffee: Start by brewing a strong cup of coffee or pulling a couple of espresso shots. Set this aside to cool completely—it’s important the coffee is cold before mixing so it doesn’t melt the ice cream base.
- Prepare the Coconut Milk Base: Open a can of full-fat coconut milk and give it a good shake to combine the cream and liquid. Pour it into a bowl along with sugar, vanilla extract, and a pinch of salt. Whisk everything together until the sugar dissolves and the mixture is smooth.
- Combine and Chill: Slowly stir the cooled coffee into the coconut milk mixture, ensuring everything is well mixed. Cover the bowl and refrigerate it for at least one hour so it chills thoroughly, which helps with the texture of your ice cream later.
- Freeze the Mixture: Pour the chilled mixture into your ice cream maker and churn according to manufacturer instructions—usually about 20-30 minutes—until it reaches a soft-serve consistency. If you don’t have an ice cream maker, pour the mixture into a shallow container and freeze, stirring every 30 minutes until thick.
- Final Freeze: Transfer the ice cream to an airtight container and freeze for at least 3-4 hours to firm up. This step is key to achieving that perfect scoopable texture you want.
Notes
- Use full-fat coconut milk for the richest, creamiest texture without dairy.
- Chill both coffee and coconut milk base thoroughly before churning.
- Adjust sweetness gradually after chilling and before freezing to taste.
- A pinch of salt amplifies the flavors and balances coffee’s bitterness.
- Adjust churn time for softer or denser ice cream based on preference.
Nutrition
- Serving Size: 1/2 cup
- Calories: 180
- Sugar: 15g
- Sodium: 30mg
- Fat: 15g
- Saturated Fat: 13g
- Unsaturated Fat: 2g
- Trans Fat: 0g
- Carbohydrates: 12g
- Fiber: 1g
- Protein: 1g
- Cholesterol: 0mg
Keywords: Coffee ice cream, coconut milk ice cream, dairy-free dessert, vegan ice cream, coconut coffee dessert, summer treat