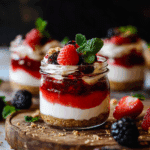
Easy No Bake Cheesecake Jars You’ll Love

If you’re craving a dessert that’s easy, delicious, and requires no oven time, then Easy No Bake Cheesecake Jars are your new best friend. These delightful little jars combine creamy cheesecake filling, buttery crust, and fresh toppings, creating a perfect treat you can whip up anytime. Whether for a quick snack or a fancy dessert, this recipe is as simple as it is mouthwatering.
Why You’ll Love This Recipe
- No oven needed: Perfect for hot days or when your oven is busy, this dessert requires no baking at all.
- Individual portions: Easy No Bake Cheesecake Jars are served in jars, making portion control simple and presentations cute.
- Quick and fuss-free: Ready in under 30 minutes, it’s ideal for last-minute guests or a sweet craving fix.
- Customizable layers: You can switch up crusts, fillings, and toppings easily to suit your mood or pantry.
- Kid-friendly and inviting: These jars are visually appealing and a big hit with family and friends alike.
Ingredients You’ll Need
The beauty of Easy No Bake Cheesecake Jars lies in using straightforward, accessible ingredients that combine to deliver a creamy, textured, and flavorful dessert. Each element works together to balance richness, crunch, and a touch of sweetness.
- Cream cheese: The star ingredient that creates the smooth and tangy cheesecake base.
- Heavy cream: Whipped to add lightness and fluffiness to the filling.
- Graham crackers or digestive biscuits: Crumbled to form the buttery crust with a delightful crunch.
- Butter: Melted and mixed with crumbs to hold the crust together perfectly.
- Sugar: Sweetens the cheesecake filling just right without overpowering.
- Vanilla extract: Adds warm, aromatic depth to the cream cheese mixture.
- Fresh fruit or preserves: Optional toppings that lend color, freshness, and extra flavor pops.
Variations for Easy No Bake Cheesecake Jars
One of the best things about Easy No Bake Cheesecake Jars is how easy they are to customize. Whether you want to cater to dietary preferences, try different flavor combos, or experiment with textures, these jars welcome your creativity.
- Chocolate lover’s twist: Add cocoa powder to the cheesecake mix or layer with chocolate chips for a rich dessert.
- Berry burst: Use mixed berries or strawberry compote as a topping for a fresh and tangy finish.
- Vegan version: Substitute cream cheese and cream with coconut cream and vegan cream cheese alternatives.
- Nuts and crunch: Add chopped walnuts or almonds into the crust or sprinkle on top for an added crunch.
- Flavor infusion: Mix in citrus zest or spices like cinnamon or cardamom to create unique flavor profiles.

How to Make Easy No Bake Cheesecake Jars
Step 1: Prepare the Crust
Start by crushing the graham crackers or digestive biscuits into fine crumbs, then mix them with melted butter until the texture looks like wet sand. Press this mixture into the base of each jar to form an even crust layer. Refrigerate briefly so it sets properly.
Step 2: Whip the Cream
In a cold bowl, whip the heavy cream until it forms soft peaks. This will add lightness to your cheesecake filling and make it incredibly creamy.
Step 3: Make the Cheesecake Filling
Using a separate bowl, beat the softened cream cheese until smooth and creamy. Add sugar and vanilla extract, then gradually fold in the whipped cream, taking care to keep as much air in the mixture as possible for a fluffy finish.
Step 4: Assemble the Jars
Layer the cheesecake filling over the crust in each jar. You can add layers by alternating filling and crushed cookies, or keep it simple with just one thick cheesecake layer.
Step 5: Add Toppings
Top your jars with fresh fruit, fruit preserves, chocolate shavings, or a drizzle of caramel. Get creative and choose toppings that excite your taste buds!
Step 6: Chill
Place the jars in the fridge for at least 4 hours or overnight to let the cheesecake set perfectly for that signature smooth texture.
Pro Tips for Making Easy No Bake Cheesecake Jars
- Use room temperature cream cheese: This helps avoid lumps and ensures a smoother filling mix.
- Don’t overwhip the cream: Stop at soft peaks to keep the filling light without turning it grainy.
- Press crust firmly: A compact base holds together better and makes serving easier.
- Choose jars wisely: Wide-mouthed jars give more surface area for creative toppings.
- Refrigerate well: Chilling overnight results in the best texture and flavor development.
How to Serve Easy No Bake Cheesecake Jars
Garnishes
Fresh mint leaves, a dusting of cocoa powder, sliced fruits, or a drizzle of honey make excellent garnishes that enhance both the presentation and flavor of your cheesecake jars.
Side Dishes
Pair your cheesecake jars with a cup of hot coffee or tea, or serve alongside fresh berries for a light and balanced dessert experience.
Creative Ways to Present
For special occasions, tie a ribbon or twine around each jar, use colorful lids, or serve them layered in clear glassware for an elegant touch that wows your guests.
Make Ahead and Storage
Storing Leftovers
Keep leftover Easy No Bake Cheesecake Jars covered in the refrigerator for up to three days to maintain freshness and avoid the crust becoming soggy.
Freezing
These jars freeze beautifully. Cover tightly and freeze for up to one month. Thaw overnight in the fridge before serving for best results.
Reheating
This dessert is best served chilled, so avoid reheating. Instead, simply let frozen jars thaw to room temperature naturally for the ideal creamy texture.
FAQs
Can I use low-fat cream cheese for this recipe?
Yes, although full-fat cream cheese provides the best texture and flavor, low-fat versions can be used if you prefer a lighter dessert; just keep in mind the consistency might be slightly less creamy.
How long do Easy No Bake Cheesecake Jars last in the fridge?
They typically stay fresh for about three days when stored in airtight containers, allowing you to prepare in advance without worry.
Can I make these jars without heavy cream?
While heavy cream adds important richness and fluffiness, you can substitute with whipped coconut cream or even Greek yogurt, but expect a different texture and taste.
Are these jars suitable for kids?
Absolutely! They’re small, manageable portions with familiar flavors that kids love, plus no baking means less hassle in the kitchen.
Can I add alcohol or liqueur to the filling?
Yes, adding a splash of your favorite liqueur like Baileys or Grand Marnier can enhance the flavor, but use it sparingly to avoid disrupting the texture.
Final Thoughts
Easy No Bake Cheesecake Jars are truly a joy to make and eat. With simple ingredients and minimal effort, they deliver creamy, indulgent satisfaction in every spoonful. Whether for a busy weeknight or a special dessert, give this recipe a try and watch it become a staple in your sweet treat rotation.
PrintEasy No Bake Cheesecake Jars
Easy No Bake Cheesecake Jars are a delicious, oven-free dessert featuring creamy cheesecake filling, a buttery crumb crust, and fresh toppings served in individual jars. Perfect for quick preparation, customizable layers, and visually appealing treats suitable for any occasion.
- Prep Time: 15 minutes
- Cook Time: 0 minutes
- Total Time: 4 hours 15 minutes (includes chilling time)
- Yield: 6-8 jars 1x
- Category: Dessert
- Method: No-Bake
- Cuisine: American
- Diet: Vegetarian
Ingredients
Crust
- 1 1/2 cups graham crackers or digestive biscuits, crushed
- 5 tablespoons melted butter
Cheesecake Filling
- 16 oz (450g) cream cheese, softened to room temperature
- 1/2 cup sugar
- 1 teaspoon vanilla extract
- 1 cup heavy cream, whipped to soft peaks
Toppings (optional)
- Fresh fruit (e.g., berries, sliced strawberries)
- Fruit preserves or compote
- Chocolate shavings or chips
- Drizzle of caramel
- Chopped nuts (walnuts, almonds)
- Fresh mint leaves
Instructions
- Prepare the Crust: Crush graham crackers or digestive biscuits into fine crumbs. Mix the crumbs with melted butter until the mixture resembles wet sand. Press evenly into the base of each jar to form a crust layer. Refrigerate briefly to set.
- Whip the Cream: In a cold bowl, whip the heavy cream until soft peaks form to add lightness and fluffiness to the filling.
- Make the Cheesecake Filling: In a separate bowl, beat the softened cream cheese until smooth and creamy. Add sugar and vanilla extract, mixing well. Gradually fold in the whipped cream carefully to maintain airiness for a fluffy texture.
- Assemble the Jars: Layer the cheesecake filling over the chilled crust in each jar. Optionally, alternate layers of filling and crushed cookies for added texture or keep it simple with a single thick layer.
- Add Toppings: Top each jar with fresh fruit, preserves, chocolate shavings, caramel drizzle, or nuts according to your preference.
- Chill: Refrigerate the assembled jars for at least 4 hours or overnight to allow the cheesecake to set with a smooth texture.
Notes
- Use room temperature cream cheese to avoid lumps and ensure a smooth filling.
- Do not overwhip the cream; stop at soft peaks to keep the filling light and creamy without graininess.
- Press the crust firmly for a compact base that holds together and serves easily.
- Choose wide-mouthed jars to allow for creative and ample topping space.
- Chill overnight for optimal texture and flavor development.
- Store leftovers covered in the refrigerator for up to three days to maintain freshness.
- These jars can be frozen for up to one month; thaw overnight in the fridge before serving.
- This dessert is best served chilled; avoid reheating to maintain texture.
Nutrition
- Serving Size: 1 jar (approx. 150g)
- Calories: 350 kcal
- Sugar: 20g
- Sodium: 220mg
- Fat: 28g
- Saturated Fat: 16g
- Unsaturated Fat: 10g
- Trans Fat: 0g
- Carbohydrates: 20g
- Fiber: 1g
- Protein: 5g
- Cholesterol: 80mg
Keywords: no bake cheesecake, cheesecake jars, easy dessert, individual cheesecake, no oven dessert, creamy cheesecake, quick dessert