Japanese Tuna Onigiri

If you’ve ever wanted to whip up a delicious, authentic Japanese snack at home, this Japanese Tuna Onigiri recipe is an absolute must-try. These savory rice balls packed with flavorful tuna offer a wholesome bite that’s perfect for lunchboxes, quick snacks, or even as part of a picnic spread. Simple to prepare yet incredibly satisfying, these Japanese Tuna Onigiri capture the essence of traditional Japanese comfort food in every bite.
Why You’ll Love This Recipe
- Quick and Easy: Ready in under 20 minutes, perfect for busy weekdays or last-minute cravings.
- Authentic Flavors: Experience the genuine taste of tuna mixed with savory seasonings wrapped in perfectly steamed rice.
- Healthy and Filling: Combines lean protein and carbohydrates for a balanced and energizing snack or meal.
- Versatile Snack: Ideal for lunches, picnics, or on-the-go meals without any messy cleanup.
- Customizable: You can easily adjust the filling or rice seasoning to suit dietary preferences or taste buds.
Ingredients You’ll Need
Crafting perfect Japanese Tuna Onigiri starts with a handful of simple yet essential ingredients. Each one plays a key role—whether it’s providing flavor, texture, or that essential umami punch that keeps you coming back for more.
- Short-grain rice: Use Japanese sushi rice for its sticky and tender texture, crucial for shaping onigiri.
- Canned tuna: Opt for tuna packed in water or oil, depending on your preferred richness.
- Mayonnaise: Adds creaminess and helps bind the tuna filling perfectly.
- Soy sauce: Provides a salty, savory depth that complements the tuna beautifully.
- Salt: Essential for seasoning the rice and balancing flavors.
- Nori sheets: Optional but traditional, these seaweed wraps provide extra flavor and keep hands clean.
Variations for Japanese Tuna Onigiri
This Japanese Tuna Onigiri recipe is wonderfully flexible, inviting you to get creative in the kitchen. Whether you want to add a little extra kick or cater to allergies, it’s easy to adapt.
- Spicy tuna filling: Mix in a little Sriracha or chili paste for a fiery twist on the classic.
- Avocado addition: Incorporate small cubes of avocado for creaminess and added nutrition.
- Wasabi mayo: Combine wasabi powder with mayonnaise to give your onigiri a delectable zing.
- Vegetarian version: Replace tuna with mashed chickpeas or seasoned tofu for a meat-free option.
- Sesame seeds: Coat the rice exterior with toasted sesame seeds for an added nutty crunch and visual appeal.

How to Make Japanese Tuna Onigiri
Step 1: Prepare the Rice
Rinse the short-grain rice under cold water until it runs clear, then cook it according to package instructions using a rice cooker or stovetop method. Allow the rice to cool slightly but remain warm to make shaping easier.
Step 2: Mix the Tuna Filling
Drain the canned tuna thoroughly and place it in a bowl. Add mayonnaise and soy sauce, then gently mix until well combined. Taste and adjust seasoning if needed for the perfect savory balance.
Step 3: Shape the Onigiri
With slightly wet hands to prevent sticking, take a handful of warm rice and flatten it in your palm. Place a spoonful of the tuna mixture in the center, then carefully mold the rice around the filling into a neat triangle or ball shape.
Step 4: Wrap with Nori (Optional)
If using nori sheets, cut them into strips and wrap around the base of each onigiri, pressing gently so it sticks. This adds flavor and makes the onigiri easier to handle.
Step 5: Serve or Store
Enjoy your Japanese Tuna Onigiri immediately or wrap individually in plastic wrap for lunchboxes or later snacking.
Pro Tips for Making Japanese Tuna Onigiri
- Use warm rice: Shaping is easiest when the rice is warm but not hot to avoid burning your hands.
- Wet your hands: Keep a bowl of water and a pinch of salt nearby to moisten your hands so rice won’t stick and adds flavor.
- Press gently: Avoid squishing the onigiri too tightly to keep a fluffy texture inside.
- Fresh nori: Add the seaweed right before eating to prevent sogginess and maintain crispness.
- Rice variety matters: Short-grain sticky rice works best—avoid long-grain as it won’t hold the shape.
How to Serve Japanese Tuna Onigiri
Garnishes
Add a sprinkle of toasted sesame seeds or furikake seasoning to the rice exterior for extra flavor and a beautiful finish that enhances each bite.
Side Dishes
Pair your Japanese Tuna Onigiri with a refreshing cucumber salad, miso soup, or a side of pickled vegetables for a complete and colorful Japanese-inspired meal.
Creative Ways to Present
For parties or kids’ lunches, try shaping onigiri into fun molds like stars or hearts and serve with colorful bento accessories to make mealtime more engaging and delightful.
Make Ahead and Storage
Storing Leftovers
Wrap each Japanese Tuna Onigiri individually in plastic wrap and refrigerate for up to 24 hours to preserve freshness without drying out.
Freezing
Onigiri freezes well; wrap tightly and store in an airtight container for up to one month. Thaw in the refrigerator before eating to maintain the rice’s texture.
Reheating
Warm onigiri gently in the microwave for 30-60 seconds, wrapped in a damp paper towel to rehydrate the rice without making it tough.
FAQs
Can I use different types of tuna for this recipe?
Yes, both tuna packed in water and oil work well; tuna in oil gives a richer flavor, while tuna in water keeps it lighter.
Is it necessary to use sushi rice?
Sushi rice is recommended due to its sticky texture which helps the onigiri hold their shape, but any short-grain rice can work in a pinch.
How long will Japanese Tuna Onigiri stay fresh?
Onigiri is best eaten the same day but can be refrigerated for up to 24 hours; avoid keeping it longer to maintain optimal taste and texture.
Can I make Japanese Tuna Onigiri vegan?
Absolutely! Replace tuna with mashed chickpeas or seasoned cooked mushrooms, and use vegan mayonnaise to keep the creamy texture.
What are some good drinks to pair with Japanese Tuna Onigiri?
Green tea, cold barley tea, or light sake complement the savory flavors of onigiri beautifully and enhance your overall meal experience.
Final Thoughts
Making Japanese Tuna Onigiri at home is a fun and rewarding way to bring a little slice of Japan into your kitchen. This recipe is approachable, flavorful, and endlessly customizable—perfect for anyone who loves tasty, handheld meals. Give it a try today, and you might find yourself reaching for it again and again!
Related Posts
PrintJapanese Tuna Onigiri
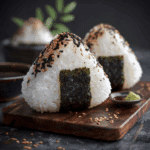
Japanese Tuna Onigiri are delicious and authentic Japanese rice balls filled with flavorful tuna mixed with creamy mayonnaise and soy sauce. Easy to make in under 20 minutes, these savory snacks are perfect for lunchboxes, quick bites, or picnic treats. They combine lean protein and sticky sushi rice for a balanced, comforting meal that captures the essence of traditional Japanese comfort food.
- Prep Time: 10 minutes
- Cook Time: 10 minutes
- Total Time: 20 minutes
- Yield: 6 onigiri 1x
- Category: Appetizers
- Method: Stovetop / Rice Cooking
- Cuisine: Japanese
- Diet: Gluten Free
Ingredients
Main Ingredients
- 2 cups short-grain Japanese sushi rice
- 1 can (about 5 oz) tuna packed in water or oil, drained
- 2 tablespoons mayonnaise
- 1 teaspoon soy sauce
- 1/2 teaspoon salt (for rice seasoning)
- 2–3 nori sheets (seaweed), cut into strips (optional)
Instructions
- Prepare the Rice: Rinse the short-grain rice under cold water until the water runs clear. Cook the rice according to the package instructions using a rice cooker or stovetop method. Once cooked, let it cool slightly but keep it warm for easier shaping.
- Mix the Tuna Filling: Drain the canned tuna thoroughly and place it in a bowl. Add mayonnaise and soy sauce, then gently mix until well combined. Taste and adjust the seasoning if needed for the perfect savory balance.
- Shape the Onigiri: Wet your hands with water mixed with a pinch of salt to prevent sticking. Take a handful of warm rice and flatten it in your palm. Place a spoonful of the tuna mixture in the center, then carefully mold the rice around the filling into a neat triangle or ball shape.
- Wrap with Nori (Optional): If using nori sheets, wrap a strip around the base of each onigiri, pressing gently so it sticks. This adds flavor and makes the onigiri easier to handle.
- Serve or Store: Enjoy the Japanese Tuna Onigiri immediately, or wrap each in plastic wrap for lunchboxes or later snacking.
Notes
- Use warm rice to make shaping easier and prevent sticking.
- Wet your hands with salted water to keep rice from sticking and add flavor.
- Press the onigiri gently to retain a fluffy texture inside.
- Add nori just before eating to keep it crisp and avoid sogginess.
- Use short-grain sticky rice for the best texture and shape holding.
Nutrition
- Serving Size: 1 onigiri
- Calories: 180
- Sugar: 0.5g
- Sodium: 350mg
- Fat: 6g
- Saturated Fat: 1g
- Unsaturated Fat: 4g
- Trans Fat: 0g
- Carbohydrates: 25g
- Fiber: 1g
- Protein: 8g
- Cholesterol: 15mg
Keywords: Japanese tuna onigiri, tuna rice balls, Japanese snack, sushi rice, onigiri recipe, quick Japanese recipe, healthy Japanese snack


